Classic NES Series Anti-Emulation Measures
Some of you may remember a series of peculiar Game Boy Advance games that came out over the course of 2004. In stark contrast with the usual dark grey cartridges with colorful labels, a set of light grey cartridges with simple labels were released containing games ported from the original Nintendo Entertainment System. Dubbed the Classic NES Series in the United States, these games were interesting for a number of reasons.
From a GBA emulation perspective, the games were especially interesting. The average Game Boy Advance game is extremely buggy, and the platform itself contains a number of safeguards to prevent games from crashing. As a result, emulators tend to need to be bug-compatible with the original hardware to ensure that the games actually work. However, the Classic NES Series goes above and beyond the average game in an attempt to ensure they don’t work in emulators.
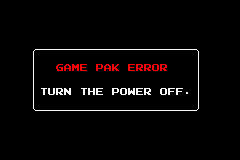
If you’ve tried to load one in some older emulators, you’ve probably been confronted with a Game Pak Error screen, as seen above. As it turns out, these games exploit several tricks and undefined behaviors that make emulating them challenging. This appears to be a deliberate attempt to dissuade copying these games. In the interest of accuracy, I have painstakingly investigated, implemented and chronicled all of the unusual things I’ve found these games to do.
Trick #1: Memory mirroring ⬨
The first trick that the games pull involves the Game Boy Advance’s memory layout. The Game Boy Advance has a flat (non-segmented) memory address space, however, the top eight bits of the address signal to the bus as to which device should have access to it at that time. 00 is the BIOS, 02 is the main RAM, 03 is the on-chip RAM, etc. However, since only the top 8 bits signal the device, and most of the devices have a very limited (less than 16 MiB) address space, bits in between the top 8 bits and the low bits that signal the address within the device have no defined purpose.
For example, the main RAM is 256 KiB. That equates to 18 bits of address space. This means that the addresses for this region of memory are from 02000000 to 0203FFFF, leaving everything from 02040000 to 02FFFFFF unaddressed. On a typical ARM device, accessing invalid addresses results in something called a data abort. However, the GBA does not support data aborts, and what happens in this particular case is interesting. Since the top 8 bits are used for selecting the device, and the bottom 18 are used for addressing into the device, there are 6 bits in the middle that are unused. These unused bits are actually just ignored. This means that if you try to access anything above the valid regions of memory in main RAM, the top bits are effectively masked out and you’re left with a valid address once more. Some emulators refer to this as “mirrored” memory.
What the Classic NES Series does with mirrored memory isn’t particularly special: it copies code into main RAM and then jumps to one of these mirror addresses. This tends to confuse some emulators, but it’s never been a problem in mGBA, due to how it implemented memory regions. However, this is by far the least troublesome trick that the Classic NES series pulls.
Trick #2: Code in VRAM ⬨
What the games do next is far more interesting: they start copying data into video RAM, which alone is perfectly normal, but then it jumps execution into this copied data in VRAM: it was copying code into a region of RAM that is usually reserved for graphics, and then executing it in place. The first time I saw the games do this, I thought I must have done something very wrong. Jumping to an invalid address is a common symptom of a bug in the emulation gone sour, and it tends to happen when copying over addresses or memory that’s being executed. Upon deeper inspection, I discovered that if I allowed the game to actually run code in VRAM, it would not crash, and seem to be relatively stable. There were several remaining problems, but this was clearly a tactic to throw off emulation. Using VRAM for something it’s very clearly not intended for definitely threw me off at first, but once I let the games do that, I ran into a few more problems.
Trick #3: STM to DMA registers ⬨
The next trick they pull is a very unorthodox use of the STM instructions. STM, which stands for “store multiple”, is a class of instructions that are meant to pack the values of multiple CPU registers into consecutive memory. There are four varieties of STM instructions: decrement after, decrement before, increment after and increment before. The “decrement after” refers to the layout of the memory that it packs: the values are stored one at a time, decrementing the address by the size of a word after it stores each word. On the surface, this seems like it means the order in which the memory writes occur would be decrementing. If you’re storing values A, B and C, you’d wind up with CBA in memory, so you might as well start with A, as that’s the initial address, and work your way backwards.
However, as Martin Korth wrote about, the processor actually figures out in advance what the address of the final register will be and then writes them out in the same order as if it had been incrementing instead of decrementing. Thus, despite the fact that the memory ends up as CBA, it writes C first. An emulator would need to do a count of how many registers are to be stored beforehand, which can be slower. Now, in general, the order in which memory is written seems like it should be irrelevant, especially on a single core processor, where memory writes may be assumed to be atomic. For main RAM, this may be correct. (Since the write is done with one instruction, a DMA cannot preempt the CPU in the middle of the writes.) However, the Classic NES Series games are pulling a clever trick with these: setting up a DMA transfer in one instruction.
DMA transfers are used for copying memory from one region to another efficiently, often either from the Game Pak to main RAM, or from main RAM to the audio FIFOs. There are three consecutive registers in the memory-mapped I/O register region of memory per DMA channel (and there are four DMA channels) that can be written to to set up a DMA transfer. Usually, a game will set the source and destination addresses with two separate 32-bit stores, then start the transfer by writing the count and DMA control bits with either one final 32-bit store, or two 16-bit stores to each half of the control register.
What the Classic NES Series games do a few times is much more clever: since these three registers are consecutive in memory, they use the STMIA and STMDA instructions to store the three values at once. STMIA is the easy case: write one register, increment, write the next register, increment, write the control register, increment. STMDA is a bit different: since it’s decrementing, an uninformed emulator implementation may write the control bits before the addresses, resulting in an incorrect DMA transfer. Despite the fact that A, B and C are written as CBA, and the initial address is that of A, A needs to be written last. I needed to do a population count on the number of registers being written, and adjust the initial offset of the write to get the ordering working properly. After fixing these operations to what the hardware expects, the transfers are done properly.
Trick #4: Save type masquerading ⬨
The tricks don’t end there, however. The next trick is a bit less clever, however, and there are other games that pull this trick as well. On a Game Boy Advance cartridge, there may be one of several different saving mechanisms. Some games use a save-on-battery or otherwise NVRAM that is byte-addressable. These exist in the 0E block of memory, and can be stored to normally. Other cartridges use Flash memory in the same region, and use a standard protocol to burn bytes onto the Flash, or erase regions for reprogramming. A third type is EEPROM, which exists at the high end of the Game Pak memory region, in region 0D. These use a bit-level protocol handled with DMA transfers to send series of bits to the EEPROM for programming. However, each game can only have one of these save types, and the cartridge header does not specify which a cartridge will have. Several emulators, mGBA included, try to auto-detect the save type by waiting until a game tries to interact with one of these, and determines the save type based on that. However, some games, the Classic NES Series included, fake out these emulators by trying to access the wrong type first. For instance, these games all use EEPROM, but pretend to have SRAM. If they detect that SRAM writes actually succeed, they present the Game Pak Error screen, as seen above. This one is relatively easy to defeat, and the emulator checks in advance the game code. If it detects a code associated with a Classic NES Series game, it forces the save type to EEPROM.
Trick #5: Prefetch abuse ⬨
The next trick that these games pull was the hardest one for me to figure out. It took me several days to properly discover, and required a rather low-level change to my core emulation loop. Processors in hardware have a several stage process for executing instructions, called a pipeline. Each stage does a different task such that each portion of a CPU circuit can be kept busy while another part is off doing its own step. The pipeline is designed in such a way that when an instruction is done in one stage and moves onto the next stage, the instruction afterwards can immediately fill up the now-vacant stage. The ARM7TMDI, the processor in the Game Boy Advance, has a pipeline that has three relevant stages for accurate emulation: fetching, decoding and executing. In the fetching stage, the memory bus is queried for the memory associated with an instruction. This is then passed to the decoding stage, where the processor figures out which instruction it is. Finally, the processor actually executes the instruction. A naïve interpreter may merge all three stages, either for hypothesized speed reasons, or just an uninformed idea of how processors work. mGBA was actually assuming the decoding and execution stages were combined until recently. However, an important observation was made while digging through the Classic NES Series games’ code: the game was modifying an instruction that was very close in proximity to where code was being executed already. The following assembly is extracted from VRAM in Classic NES Metroid.
06000260:  E3A01000     mov r1, #0
06000264:  E28FE008     add lr, pc, #8
06000268:  E51F0010     ldr r0, [$06000260]
0600026C:  E58E0000     str r0, [lr, #0]
06000270:  E3A010FF     mov r1, #255
06000274:  E3A010FF     mov r1, #255
What this code does is pretty simple. It stores 0 to register r1, then loads the word at 06000260 into register r0, stores it at address 06000274. Then it stores 255 to register r1, and finally…well, I lied a bit. Notice that the last instruction in this block of assembly is the very address that is being stored to two instructions prior. The value that is being stored to this address is the instruction that would store 0 to r1, instead of 255. So what does this code do? The answer depends on how long your pipeline is.
What’s imperative to understanding what’s going on in this block of code is to realize that, once the instruction has been fetched by the pipeline, changing the memory that backs that address is irrelevant. This is similar to how cache coherence works, but is even more stringent. This means that if your pipeline is long enough, the instruction that enters into the pipeline during the write is the one that stores 255. If it’s too short, it stores 0. As it turns out, the games will fail to boot if it finds the value 0 in register r1, but boots fine if it’s 255. Upon realizing this, I had to extend the emulated pipeline in mGBA to include a dummy stage in between execution and fetching. In the real ARM7TDMI pipeline, there is a decoding stage between these two stages. However, I’d misread the manual and did not realize this stage existed separately. Adding another stage to the pipeline in the interpreter, suddenly the Classic NES Series games would run!
Trick #6: Audio FIFO irregularities ⬨
There was still one complication, however: while the games were playable, audio was pretty horribly broken. This took very little debugging, but again it was these games doing something that is unique to the Classic NES Series and was thus implemented very slightly wrong due to underspecification. The Game Boy Advance has six audio channels: four procedurally generated audio channels, which are a functional superset of those found on the original Game Boy, and two PCM audio channels. As far as I’ve seen, the Classic NES Series games only use one channel, and it’s one of the PCM channels. The PCM audio channels operate by having a small internal FIFO which starts a DMA transfer when it runs below a certain point. Games configure these to write 32 bits at a time to I/O registers associated with each channel. Since the PCM channels are only 8 bits wide, writing 32 bits is in fact four samples. What the Classic NES Series does is a bit different: it writes only 16 bits at a time, to one half of the register instead of the full register. Since I had assumed games would only write 32 bits at a time, this caused the emulator to end up writing the two samples requested by the game as well as two empty samples per write. This simple oversight caused completely garbled audio in the games. After adding a simple fix, the games now seem to run fine.
Success, but why the trouble? ⬨
I’m not really sure why Nintendo went all out with these games, considering that these are just ports of NES games. Full featured NES emulators have existed for many years, with good ones popping up even as early as 1997. While it’s true that the Classic NES Series games were new to being played on a portable device, emulating Game Boy Advance on other portable devices would be years off. Furthermore, while these issues certainly stymied their emulation in several projects, these protections seem to be exclusive to the Classic NES Series. I’m not sure why they put all of this effort into causing trouble for emulator developers in this one specific case, but it certainly led to several very late nights for me, trying to step through the game’s code, one function at a time, until things went noticeably wrong.
However, after fixing all of these issues, the games should now be 100% playable. Several of the pertinent fixes made it into version 0.1.0, but some of the larger fixes were not devised until later. The games will be fully supported in 0.2.0 when it’s released, and are playable right now in the nightlies.